


 Basket (
 Main Menu


Articles: Guidance on fitting Oak Tongue and Groove Cladding
This article will give an overview on how to fit your cladding. All of our products are designed to be fitted by a professional with previous experience and this overview isn’t a replacement for professional fitting advice.
When it comes to fitting your cladding there are few accessories that we recommend that you consider buying first. These will help with fitting and maintaining your Oak tongue and groove cladding.
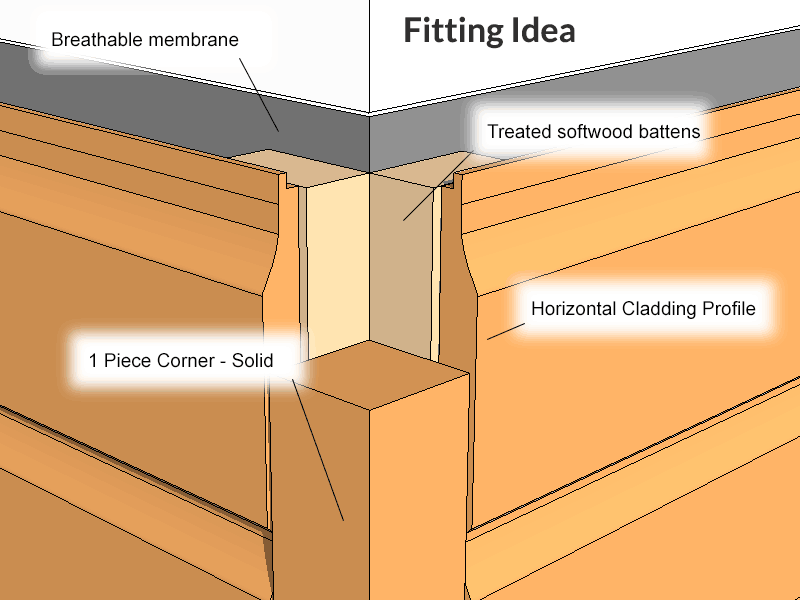
Corner Pieces
We offer both a one corner piece and two-piece corner cover, which are ideal for connecting your cladding around the corners of your building.
Fascia Boards
We supply Fascia Boards to match the timber you are cladding with (each species has its own accessories page). Fascias are used to box-in roof rafters at the top of the wall.
Softwood Battens
You can use softwood battens to fit your cladding to the wall. You should fit your battens to the wall in the opposite direction you are fitting your cladding and leave a 400-600mm gap between them.
Breathable Membrane
We don’t supply a breathable membrane but we do suggest buying one. This membrane will fix directly to the interior wall and will allow air to circulate behind you cladding which protects from rot.
Getting started
Once you have decided on what accessories you need you’ll need to decide which way around you would like to fit your Oak tongue and groove cladding. Most of profiles can be easily fitted vertically or horizontally however IWC5 can only be vertically fitted.
Once you have decided we recommend that you start with fitting the breathable membrane to the inside wall. Once fitted you can then screw your battens to the wall through the membrane.
When the battens are in place you can then start to apply the cladding boards. We recommend predrilling any holes to avoid splitting the timber and make sure that you use stainless steel screws otherwise the wood will corrode them. Also make sure that you are holding the board with the screw head rather than the shaft.
Start applying your boards from the ground up and if fitting horizontally put the tongue face up and the groove face down (this is so the water doesn’t collect in the groove of the board).
All of our cladding is provided in random lengths, so you may need to cut them down to fit them to the side of your building.
OK is there anything else I need to know about tongue and groove cladding?
We recommend that all our cladding is treated and because our T&G Oak is kiln dried it needs sealing to stop it from warping and expanding. For all cladding treatment we recommend Wood Finishes Direct.
They supply Osmo 420 which is a clear sealant which protects against UV light meaning that the colour of your boards won’t turn silvery grey for longer. So to treat oak tongue and groove cladding we recommend that you speak to them.