Basket (
 Main Menu


Siberian Larch is currently unavailable
Due to current circumstances we are not supplying Siberian Larch for the forseeable future. We would like to point you in the direction of British Larch and Thermowood as alternatives.
British Larch Feather Edge Cladding
We are sorry for any inconvenience, the iWood team.
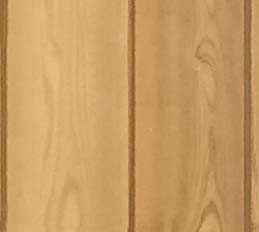
Siberian Larch Feather Edge Cladding
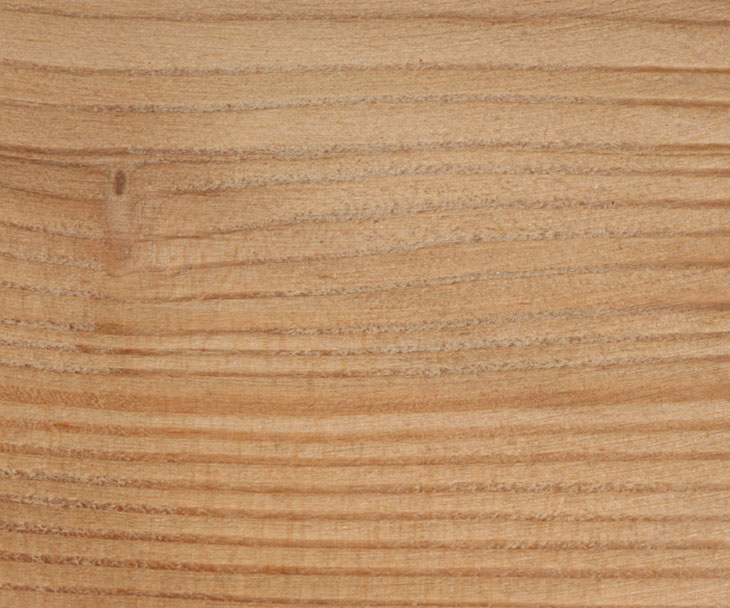
Siberian Larch Feather Edge Cladding has an attractive grain and a warm-orangey colour.
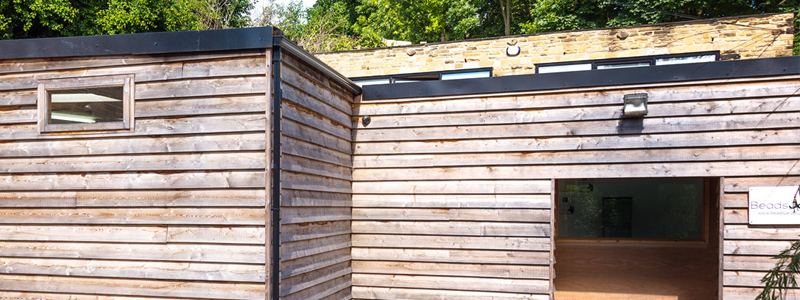
Photo: Weathered Siberian Larch Feather Edge
Work out a Price Below
1) Click to choose a Feather Edge Cladding profile
2) Click to choose a grade of Siberian Larch
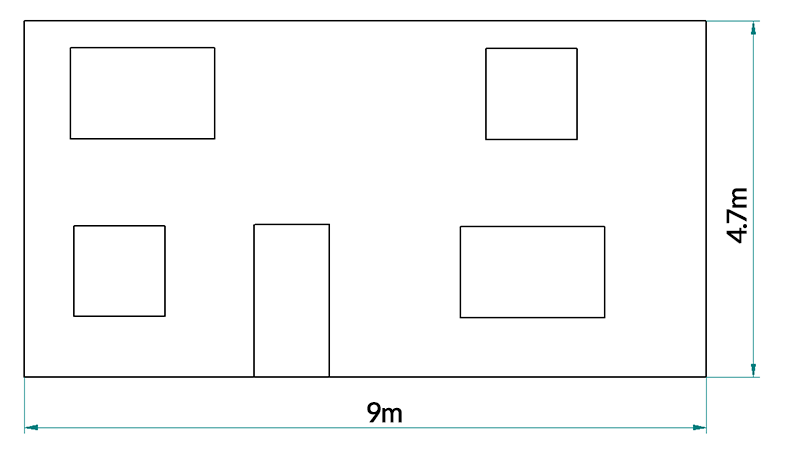
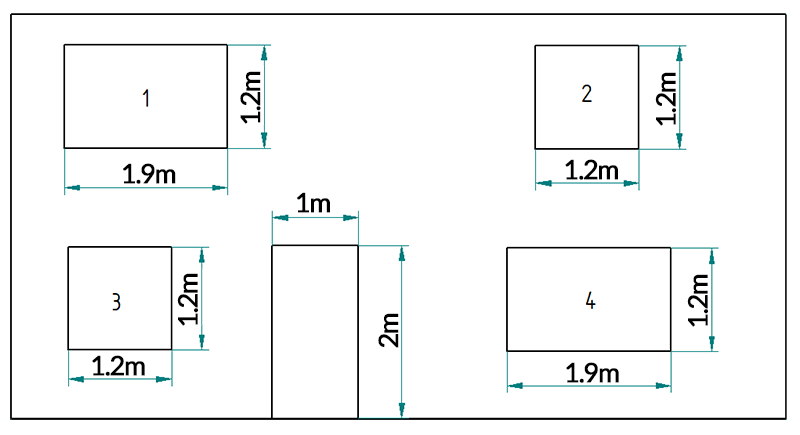
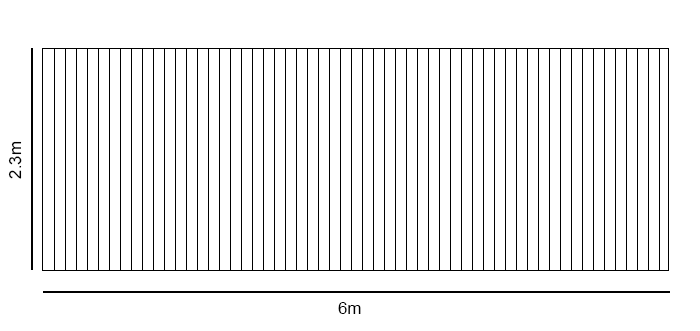
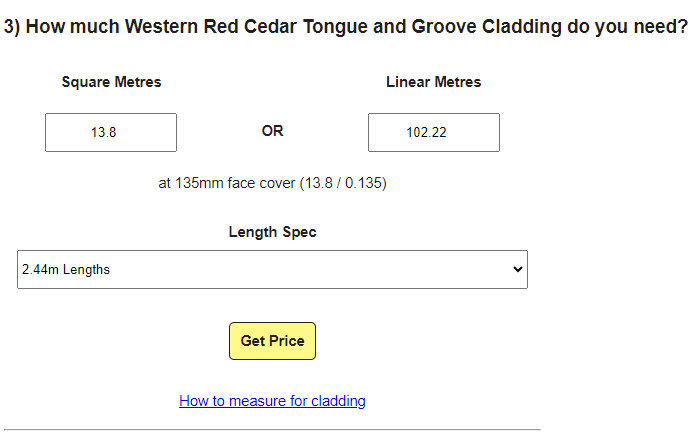
3) How much Siberian Larch Feather Edge Cladding do you need?
 Added to Basket
Siberian Larch Feather Edge Cladding
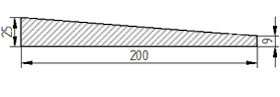
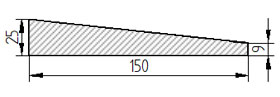
Our Siberian Larch Feather Edge cladding is supplied in two standard profiles:
- IWC9 - 200mm wide Feather Edge Siberian Larch Cladding - to be overlapped 25mm giving 175mm face cover
- IWC10 - 150mm wide Feather Siberian Larch Cladding - to be overlapped 25mm giving 125mm face cover
Feather edge is a is a popular choice for exterior cladding because there is more freedom with how it’s finished. Unlike with other cladding where there is a set overlap or groove to fix into, feather edge has a wider margin for fixing where you can fix the boards to an overlap of your choosing. This freedom and cost effectiveness of the cladding make it a popular choice.
The Sawfalling grade Siberian Larch we supply will contain knots, but fewer than the British Larch. Larch is a knottier wood than most which is one of the reasons it’s so popular because it looks more traditional. Siberian Larch feather edge cladding varies in colour from a pale reddish-brown to a brick red when fresh sawn.
The Unsorted grade will contain less knots and is the highest grade we supply, this is a very contemporary grade of timber leaving you with a clean, modern finish.
Even though it’s a fresh sawn softwood, Siberian Larch doesn’t need treating because it is naturally resistant to movement. You can treat your cladding to preserve the cladding but the most popular finish for is to let it go silvery grey as it weathers in sunlight.
All Larch cladding is supplied in random lengths to match the coverage area you need. If you would like to specify what lengths you need please contact us to confirm we can provide those lengths. If we can you can enter the lengths requested into the “Special Instructions” box on the shopping basket page.
You can contact us on 01889 279 018 or by talking to us on the online chat.
Treatments
Most people leave their timber to go the traditional silver-grey in the sun. We recommend talking to www.wood-finishes-direct.com if you would like to treat your timber. If you do decide to treat your timber, it needs to be treated all the way round including the ends to prevent moisture getting in at all.
- Ben Stanbrook and Simon Nicholson
Very detailed website for ordering my exact requirements easily.
- Richard Boundy
Great website and ordering process. Well presented and competitive pricing.
- Simon Johnson
Prices were clear to understand. My first order and went very well.
- Ernest Warren
Used before, good quality timber at a good price and good communication and service throughout the process
- Matthew Grove
Sawfalling
Product Code: IW-18-21-21-3
Specify: Sawfalling Larch, Siberian External Cladding Feather Edge Cladding from iWood Timber
Unsorted
Product Code: IW-18-21-34-3
Specify: Unsorted Larch, Siberian External Cladding Feather Edge Cladding from iWood Timber
DELIVERY TIMES
Our timber is imported straight from sawmills on the continent. Our usual lead times are therefore 14 to 17 working days.
WHAT ARE YOUR DELIVERY COSTS?
We calculate our delivery costs based on how far away you are from us, to get more information on this please check out our shipping costs page.
DELIVERY DAY
Our delivery lorries visit different parts of the country on different days, so once your order is ready we will work with you to arrange a delivery day for when one of our lorries is in your area. We will always arrange the delivery day in advance with you.
DELIVERY TIMES
We deliver weekdays Monday to Friday between the hours of 8am to 5pm. Our delivery vehicles will have multiple jobs on them which can affect the delivery time to you, depending on factors such as traffic and how long it takes to offload the previous jobs. The driver will call you in advance with an estimated time of arrival to make sure you'll be there.
HOW DO I PLACE AN ORDER FOR CLADDING?
You can place your order online by working out your price above and adding your items to your shopping basket. You can then check out and your order will be processed securely and a confirmation email sent. Once your order arrives in our depot, we'll give you a call to arrange delivery.
CAN I ORDER SAMPLES?
Yes you can, you can order samples of certain timbers at www.iwood.co.uk/sample-request/. If the species you need isn't there please give us a call or talk to us on our online chat.
The timbers shown are planed all round samples and are not profiled.
Call our seasoned sales team on 01889 597 281.
Send us a message through our Contact Form.
Email your cutting list to enquiries@iwood.co.uk.